Linux App Qt Creator
Objective
This wiki page will describe how to setup Qt Creator so it can be used to build and run an ARM Linux user-level program on the AM62 platform.
References
- https://www.youtube.com/watch?v=QYzdBbwY4dM
- https://yocto.yoctoproject.narkive.com/XZjqjf60/rocko-cmake-buld-cstdlib-75-15-fatal-error-stdlib-h-no-such-file-or-directory
- https://doc.qt.io/Boot2Qt/b2qt-meta-qt6.html
General Setup
- Install and launch Qt Creator: https://download.qt.io/official_releases/qtcreator/latest/
- Download and install Ti's processor sdk: TI processor SDK (v10.01.10.04)
- Build the Qt6 Toolchain (SDK 11 Only)
pokyuser@3ef90a36cd3a:/work$ bitbake meta-toolchain-qt6
Qt Creator CMake Hello_World example
Source the toolchain and launch Qt Creator- SDK 10.01
$ source /<SDK_INSTALL_DIR>/ti-processor-sdk-linux-am62xx-evm-10.01.10.04/linux-devkit/environment-setup
$ /<QT_CREATOR_INSTALL_DIR>/qtcreator-16.0.0/bin/qtcreator
- SDK 11
$ source /<QT_TOOLCHAIN_DIR>/environment-setup-aarch64-oe-linux
$ /<QT_CREATOR_INSTALL_DIR>/qtcreator-16.0.0/bin/qtcreator
- Navigate to toolbar: Edit->Preferences
- Select the "Kits" category
- On the Kits tab hit "Add"
- Name: "arm64 qt 5 10.1 sdk"
- Build device: Type: "Desktop"
- Run device: Type: "Remote Linux Device"
- Compiler: C/C++: GCC (C, arm 64bit at /<SDK_INSTALL_DIR>/ti-processor-sdk-linux-am62xx-evm-10.01.10.04/linux-devkit/sysroots/x86_64-arago-linux/usr/bin/aarch64-oe-linux/aarch64-oe-linux-gcc)
- Debugger: System GDB at /<SDK_INSTALL_DIR>/ti-processor-sdk-linux-am62xx-evm-10.01.10.04/linux-devkit/sysroots/x86_64-arago-linux/usr/bin/aarch64-oe-linux/aarch64-oe-linux-gdb
- Sysroot: /<SDK_INSTALL_DIR>/ti-processor-sdk-linux-am62xx-evm-10.01.10.04/linux-devkit/sysroots/aarch64-oe-linux
- Qt version: "None"
- CMake Tool" "System CMake at /usr/bin/cmake (Default)
- CMake Configuration select "Change" and add the following lines
-DOE_QMAKE_PATH_EXTERNAL_HOST_BINS:STRING=%{Env:OE_QMAKE_PATH_HOST_BINS}
-DCMAKE_NO_SYSTEM_FROM_IMPORTED:UNINITIALIZED=1
- Select the "Kits" category
- Click "Apply" then "Ok"
- Navigate to toolbar: Edit->Preferences
- Select the "Kits" category
- On the Kits tab hit "Add"
- Name: "arm64 qt 6 11 sdk"
- Build device: Type: "Desktop"
- Run device: Type: "Remote Linux Device"
- Compiler: C/C++: GCC (C, arm 64bit at /<QT_TOOLCHAIN_DIR>/sysroots/x86_64-arago-linux/usr/bin/aarch64-oe-linux/aarch64-oe-linux-gcc)
- Debugger: System GDB at /<QT_TOOLCHAIN_DIR>/sysroots/x86_64-arago-linux/usr/bin/aarch64-oe-linux/aarch64-oe-linux-gdb
- Sysroot: /<QT_TOOLCHAIN_DIR>/sysroots/aarch64-oe-linux
- Qt version: "None"
- CMake Tool" "System CMake at /usr/bin/cmake (Default)
- CMake Configuration select "Change" and replace contents with the following lines
-DQT_QMAKE_EXECUTABLE:FILEPATH=%{Qt:qmakeExecutable}
-DCMAKE_PREFIX_PATH:PATH=%{Qt:QT_INSTALL_PREFIX}
-DCMAKE_C_COMPILER:FILEPATH=%{Compiler:Executable:C}
-DCMAKE_CXX_COMPILER:FILEPATH=%{Compiler:Executable:Cxx}
-DQT_HOST_PATH:PATH=/export/home/jsava/ti_processor_sdk/ti-processor-sdk-linux-am62xx-evm-11.00.09.04/linux-devkit/sysroots/aarch64-oe-linux/usr/lib/cmake
-DQT_FORCE_FIND_TOOLS:UNINITIALIZED=ON
-DQt6WidgetsTools_DIR:UNINITIALIZED=/export/home/jsava/yocto_images/sysroots/x86_64-arago-linux/usr/lib/cmake/Qt6WidgetsTools/
-DQt6DBusTools_DIR:UNINITIALIZED=/export/home/jsava/yocto_images/sysroots/x86_64-arago-linux/usr/lib/cmake/Qt6DBusTools/
-DCMAKE_NO_SYSTEM_FROM_IMPORTED:UNINITIALIZED=1
- Select the "Kits" category
- Click "Apply" then "Ok"
Note: If the Compiler or Debugger are not automatically detected select their respective tab and add the paths above.
SDK 10.01 example kit: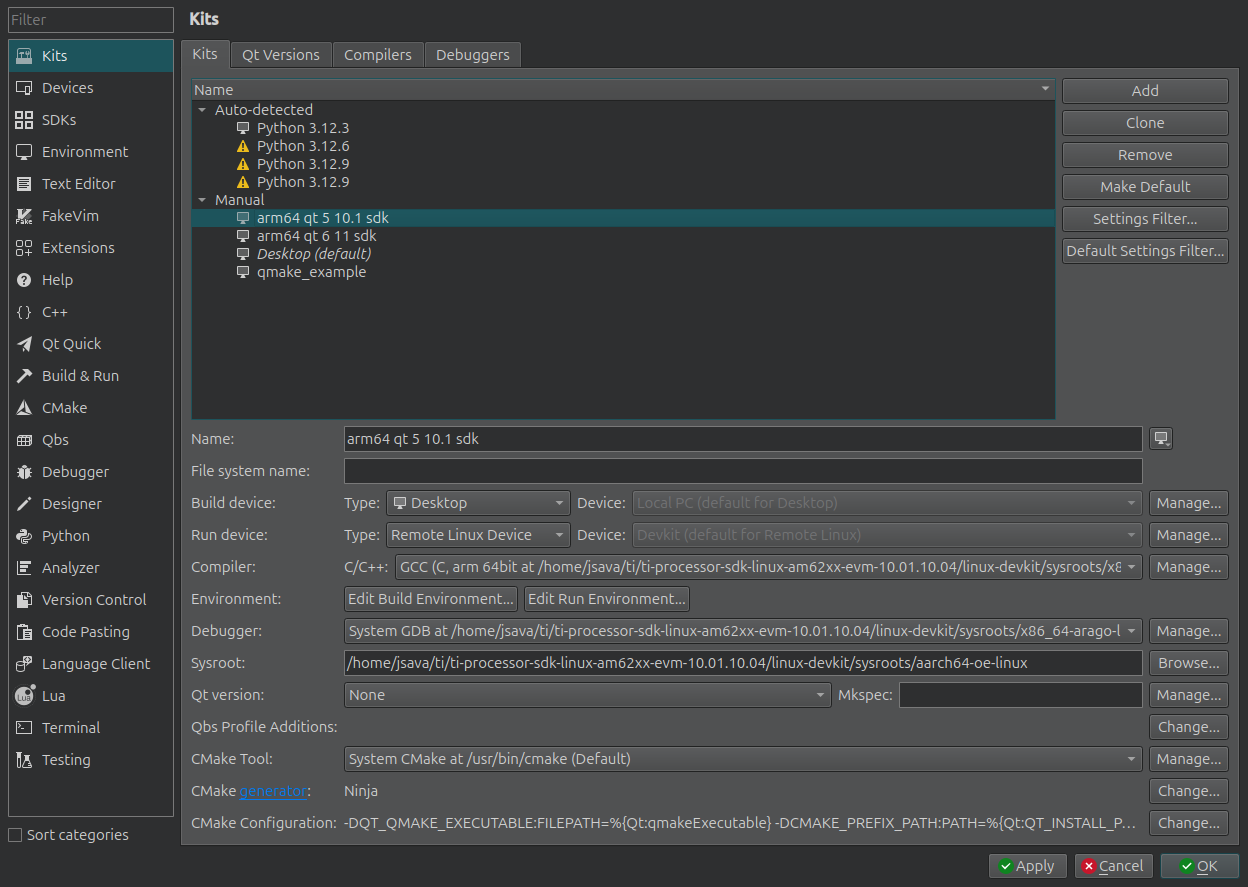
- Navigate to toolbar: Edit->Preferences
- Select the "Device" category
- In the "Devices" tab select Add->Remote Linux Device->Start Wizard
- The name to identify this configuration: "Devkit"
- The device's host name or IP address: <DEVKIT_IP_ADDRESS>
- The username to log into the device: "root"
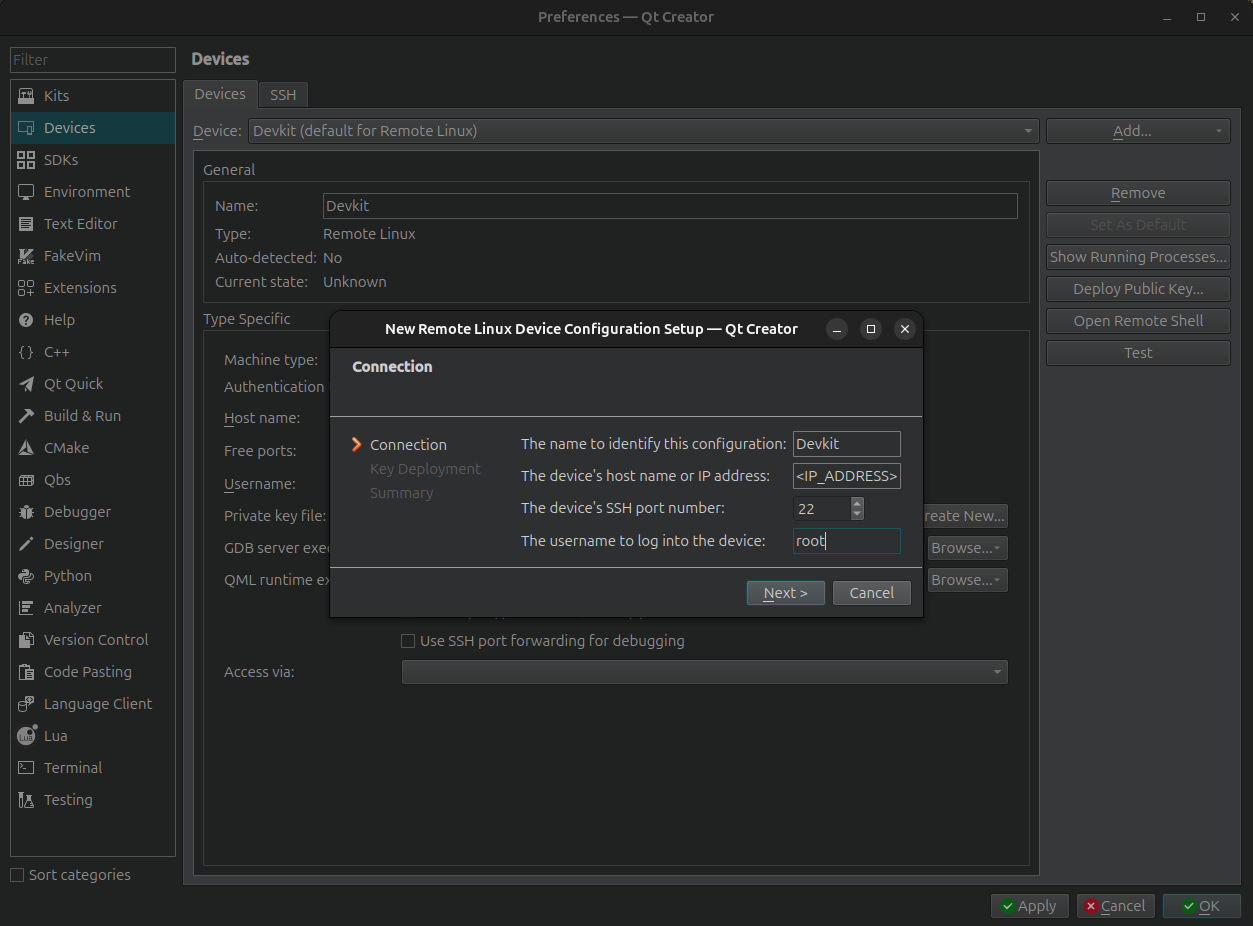
- Hit "Next" until it prompts to "Finish" the creating the device
- Device test should finish successfully
- In the "Devices" tab select Add->Remote Linux Device->Start Wizard
- Click "Apply" then "Ok"
- Select the "Device" category
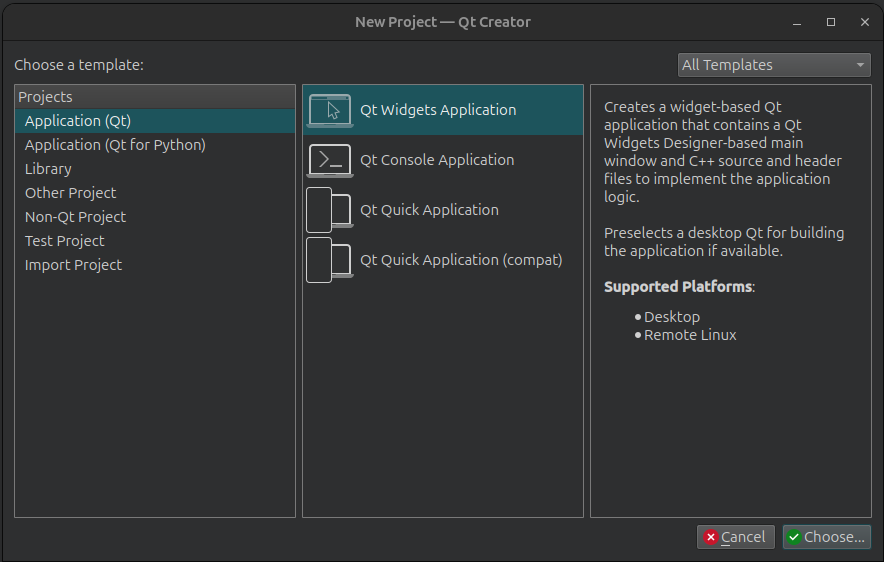
- Navigate to toolbar: File->New Project
- The following window should appear. Select "Qt Widgets Application"
- Name: "hello_world_gui"
- Next
- Build System: "CMake"
- Select "Next" until it prompts to "Finish" the project
- The following window should appear. Select "Qt Widgets Application"
- Navigate to the newly created project
- Select hello_world_gui->hello_world_gui->Froms->mainwindow.ui
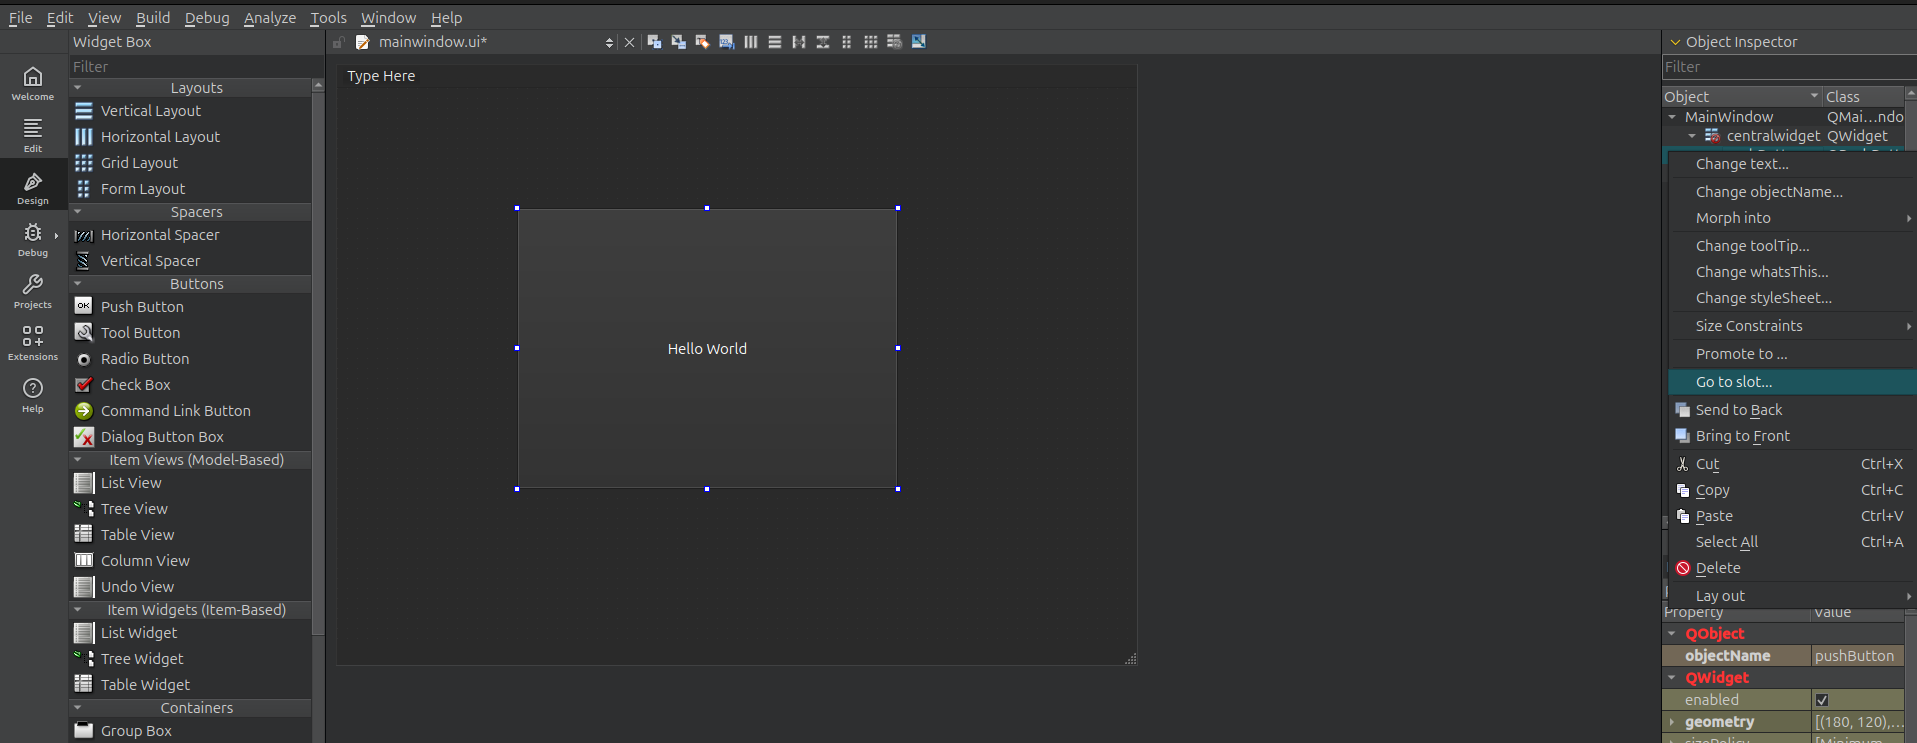
- The "Design" Tab should now be open
- Drag and drop a "Push Button" into the window
- Navigate to "Object Inspector" on the right hand side of the screen
- right click on "pushButton" and select "go to slots"
- Hit "ok" in the pop up window
- right click on "pushButton" and select "go to slots"
- Update mainwindow.cpp to have the following code:
#include "mainwindow.h" #include "./ui_mainwindow.h" MainWindow::MainWindow(QWidget *parent) : QMainWindow(parent) , ui(new Ui::MainWindow) { ui->setupUi(this); color = 0; ui->pushButton->setStyleSheet("QPushButton {background-color: purple;}\n"); } MainWindow::~MainWindow() { delete ui; } void MainWindow::on_pushButton_clicked() { QString colors[4] = {"orange", "yellow", "green", "red"}; color = (color + 1) & 0x3; ui->pushButton->setStyleSheet("QPushButton {background-color: " + colors[color] + ";}\n"); } - Update main.cpp to have the following code:
#include "mainwindow.h"

#include <QApplication>

int main(int argc, char *argv[])
{
    QApplication a(argc, argv);

    MainWindow w;
    w.setWindowTitle("Hello QT App");
    w.show();
    return a.exec();
}
- Update mainwindow.h to have the following code:
#ifndef MAINWINDOW_H
#define MAINWINDOW_H

#include <QMainWindow>

QT_BEGIN_NAMESPACE
namespace Ui {
class MainWindow;
}
QT_END_NAMESPACE

class MainWindow : public QMainWindow
{
    Q_OBJECT

public:
    MainWindow(QWidget *parent = nullptr);
    ~MainWindow();

private slots:
    void on_pushButton_clicked();

private:
    Ui::MainWindow *ui;
    int color;
};
#endif // MAINWINDOW_H
Build the project by selecting the hammer in the bottom left hand side of the screen.
The project should build without any issues
Add Environment Variables- Qt Creator needs to know the following Environmental variables in order to launch on the Devkit
- In the toolbar on the left hand side of the screen select "Project"
- SDK 10.01
- Under "Build and Run" select arm64 qt 5 10.1 sdk->Run
- In "Run Settings" find "Environment"
- Select Details and add the following
WAYLAND_DISPLAY=/run/wayland-0
XDG_RUNTIME_DIR=/run/user/0
- Select Details and add the following
- In "Run Settings" find "Environment"
- Under "Build and Run" select arm64 qt 5 10.1 sdk->Run
- SDK 11
- Under "Build and Run" select arm64 qt 6 11 sdk->Run
- In "Run Settings" find "Environment"
- Select Details and add the following
LANG=C.UTF-8
LC_ALL=C.UTF-8
QT_QPA_PLATFORM=linuxfb
- Select Details and add the following
- In "Run Settings" find "Environment"
- Under "Build and Run" select arm64 qt 6 11 sdk->Run
SDK 10.01 example environment variables: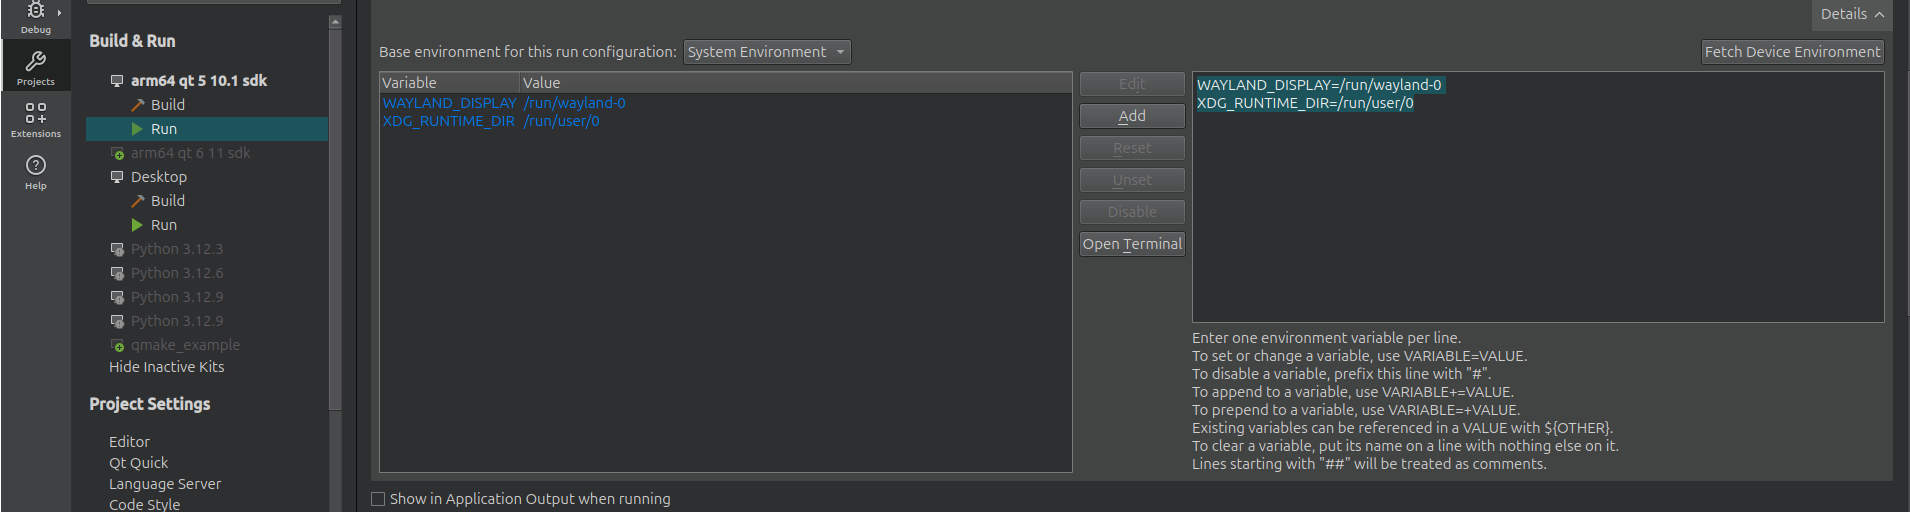
- In the toolbar on the left hand side of the screen navigate to the monitor icon with "Debug" below it
- Double check that the correct kit is selected
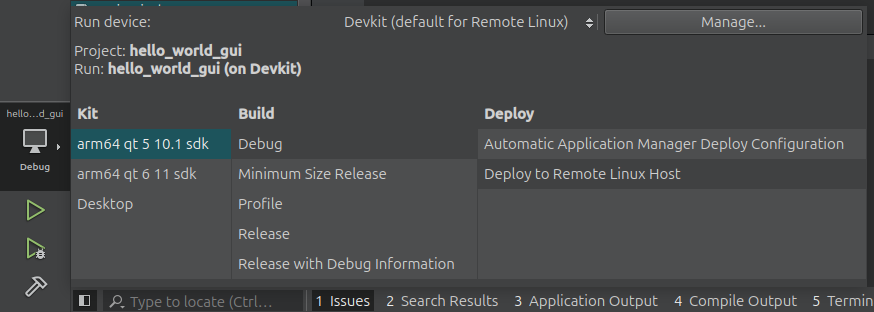
- Double check that the correct kit is selected
- Select the green launch icon below the monitor icon
Note: For SDK 11 the following command must be ran on the Devkit in order to see the Hello World GUI
root@mitysom-am62x:~# systemctl stop emptty
The GUI window should now appear on the Devkit. Make sure the HDMI display is connected.
Try plugging a mouse into the USB on J6 and clicking the push button in the GUI.
It should change colors.
Go to top

